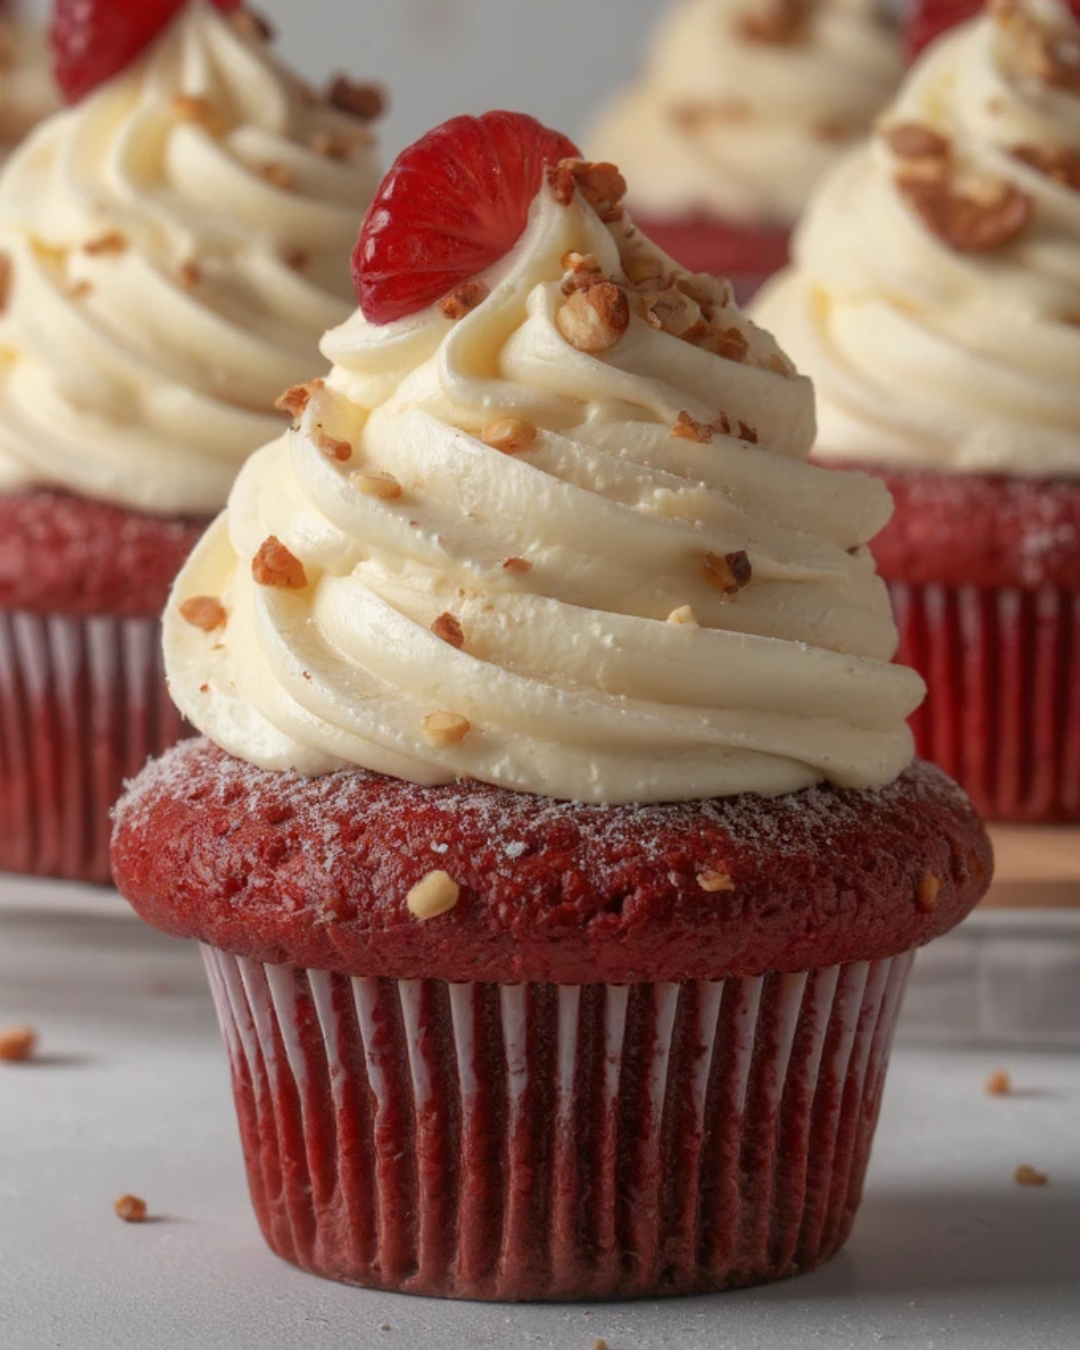
If you’re craving a dessert that’s both visually stunning and delectably sweet, the red velvet cupcake recipe is the perfect choice.
These moist, flavorful cupcakes, topped with smooth cream cheese frosting, are sure to impress any crowd. Whether you’re hosting a special occasion or simply indulging in a treat, this red velvet cupcake recipe offers a beautiful and delicious option.
Let’s dive into how to create these irresistible cupcakes from scratch, along with expert tips, variations, and storage suggestions for the ultimate baking experience.
Essential Ingredients for a Perfect Red Velvet Cupcake Recipe
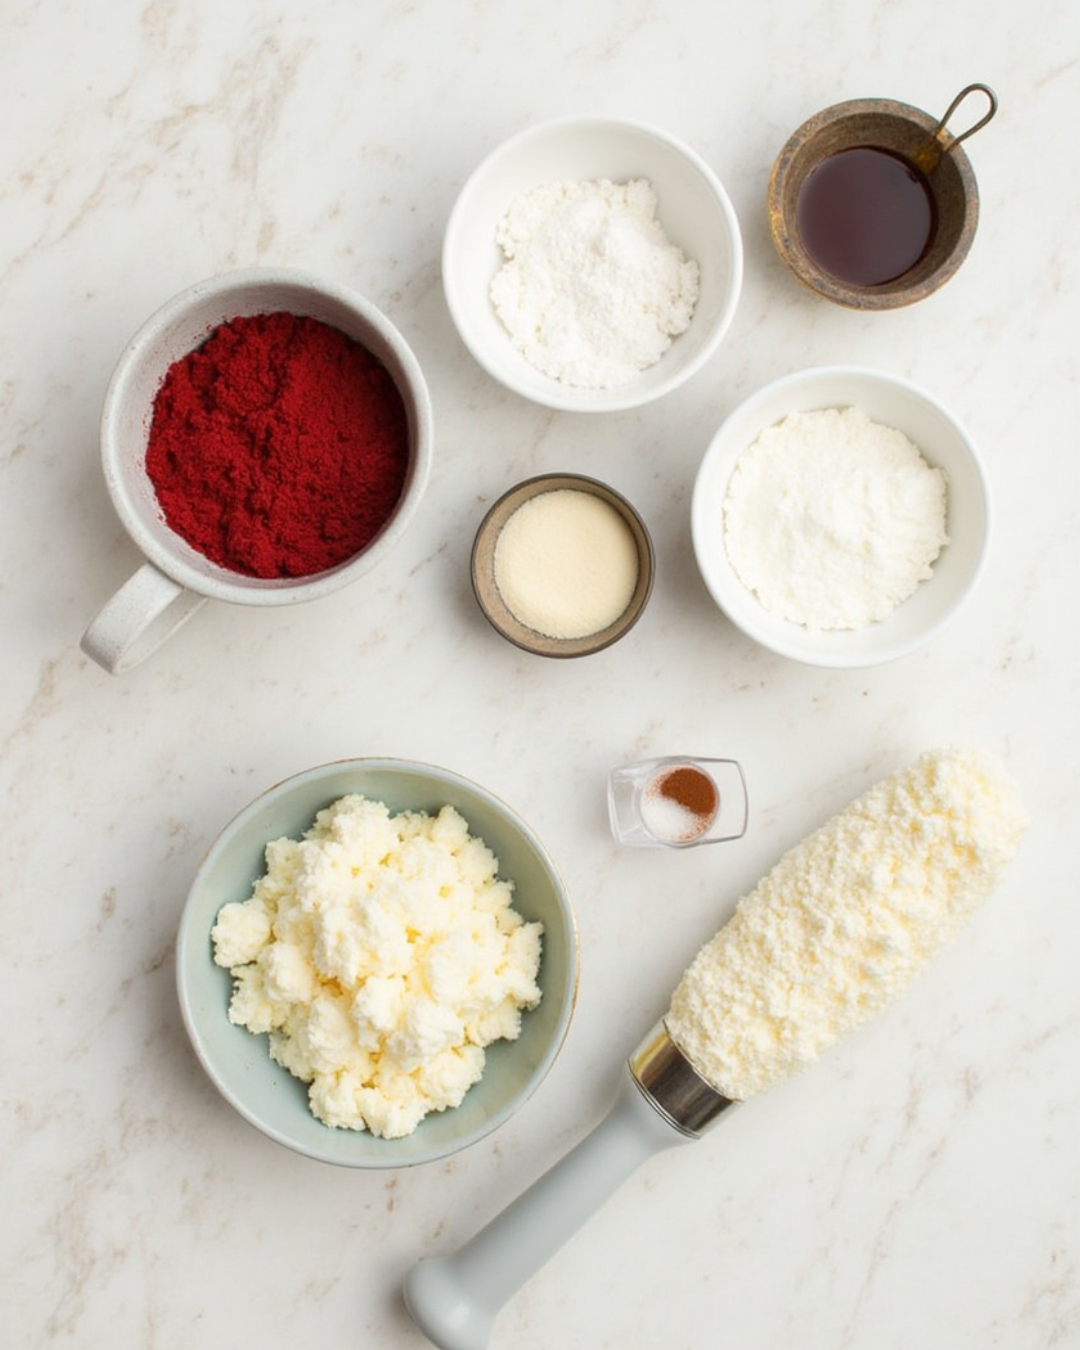
To create these rich, delicious red velvet cupcakes, you’ll need the following ingredients. Be sure to use the exact measurements for the best results.
Dry Ingredients:
- 1 ½ cups all-purpose flour (190g)
- 1 cup granulated sugar (200g)
- 1 tablespoon cocoa powder (unsweetened)
- ½ teaspoon baking powder
- ½ teaspoon baking soda
- ¼ teaspoon salt
Wet Ingredients:
- 1 cup vegetable oil (240ml)
- 2 large eggs
- 1 teaspoon vanilla extract
- 1 tablespoon red food coloring
- 1 teaspoon distilled white vinegar
- ½ cup buttermilk (120ml)
For the Cream Cheese Frosting:
- 8 oz cream cheese, softened (225g)
- ½ cup unsalted butter, softened (115g)
- 4 cups powdered sugar (480g)
- 1 teaspoon vanilla extract
- A pinch of salt
Step-by-Step Instructions for the Ultimate Red Velvet Cupcake Recipe
Now that you’ve gathered your ingredients, let’s dive into the process of creating these rich, velvety cupcakes. Follow these instructions carefully, and you’ll be rewarded with a batch of mouthwatering treats.
Step 1: Preheat the Oven and Prepare the Cupcake Pan
Begin by preheating your oven to 350°F (175°C). Line a 12-cup muffin pan with cupcake liners. This will prevent the cupcakes from sticking and make cleanup much easier. Set the pan aside for now.
Step 2: Mix the Dry Ingredients
In a medium-sized mixing bowl, whisk together the dry ingredients—flour, sugar, cocoa powder, baking powder, baking soda, and salt. Be sure to whisk well to ensure all the dry ingredients are evenly combined. The dry ingredients are the foundation for your cupcakes, so it’s important to get this step right.
Step 3: Combine the Wet Ingredients
In a separate bowl, combine the wet ingredients. Start by whisking together the vegetable oil, eggs, vanilla extract, and red food coloring. The food coloring is essential for achieving that iconic red hue. Add the vinegar and mix until the ingredients are fully incorporated.
Step 4: Alternate Adding Dry Ingredients and Buttermilk
Now, you’re ready to bring the wet and dry ingredients together. Begin by adding half of the dry ingredients to the wet ingredients and mix until just combined. Follow this by adding half of the buttermilk and mix again until smooth. Repeat the process with the remaining dry ingredients and buttermilk. Be careful not to overmix; you just want to combine everything without overworking the batter.
Step 5: Bake the Cupcakes
Once the batter is smooth and well combined, it’s time to fill the cupcake liners. Spoon the batter into each liner, filling them about two-thirds full. This will give the cupcakes room to rise while baking. Bake the cupcakes in the preheated oven for 18-22 minutes. To check for doneness, insert a toothpick into the center of a cupcake. If it comes out clean, the cupcakes are ready.
Step 6: Let the Cupcakes Cool
After baking, remove the cupcakes from the oven and allow them to cool in the pan for 5 minutes. Then, transfer them to a wire rack to cool completely. It’s important to let the cupcakes cool fully before frosting them to prevent the frosting from melting.
Step 7: Make the Cream Cheese Frosting
While the cupcakes are cooling, it’s time to prepare the frosting. In a large mixing bowl, beat the softened cream cheese and butter together using an electric mixer on medium speed until smooth and creamy. Gradually add the powdered sugar, ½ cup at a time, mixing until it’s fully incorporated. Add the vanilla extract and a pinch of salt and beat until the frosting is light and fluffy.
Step 8: Frost the Cupcakes
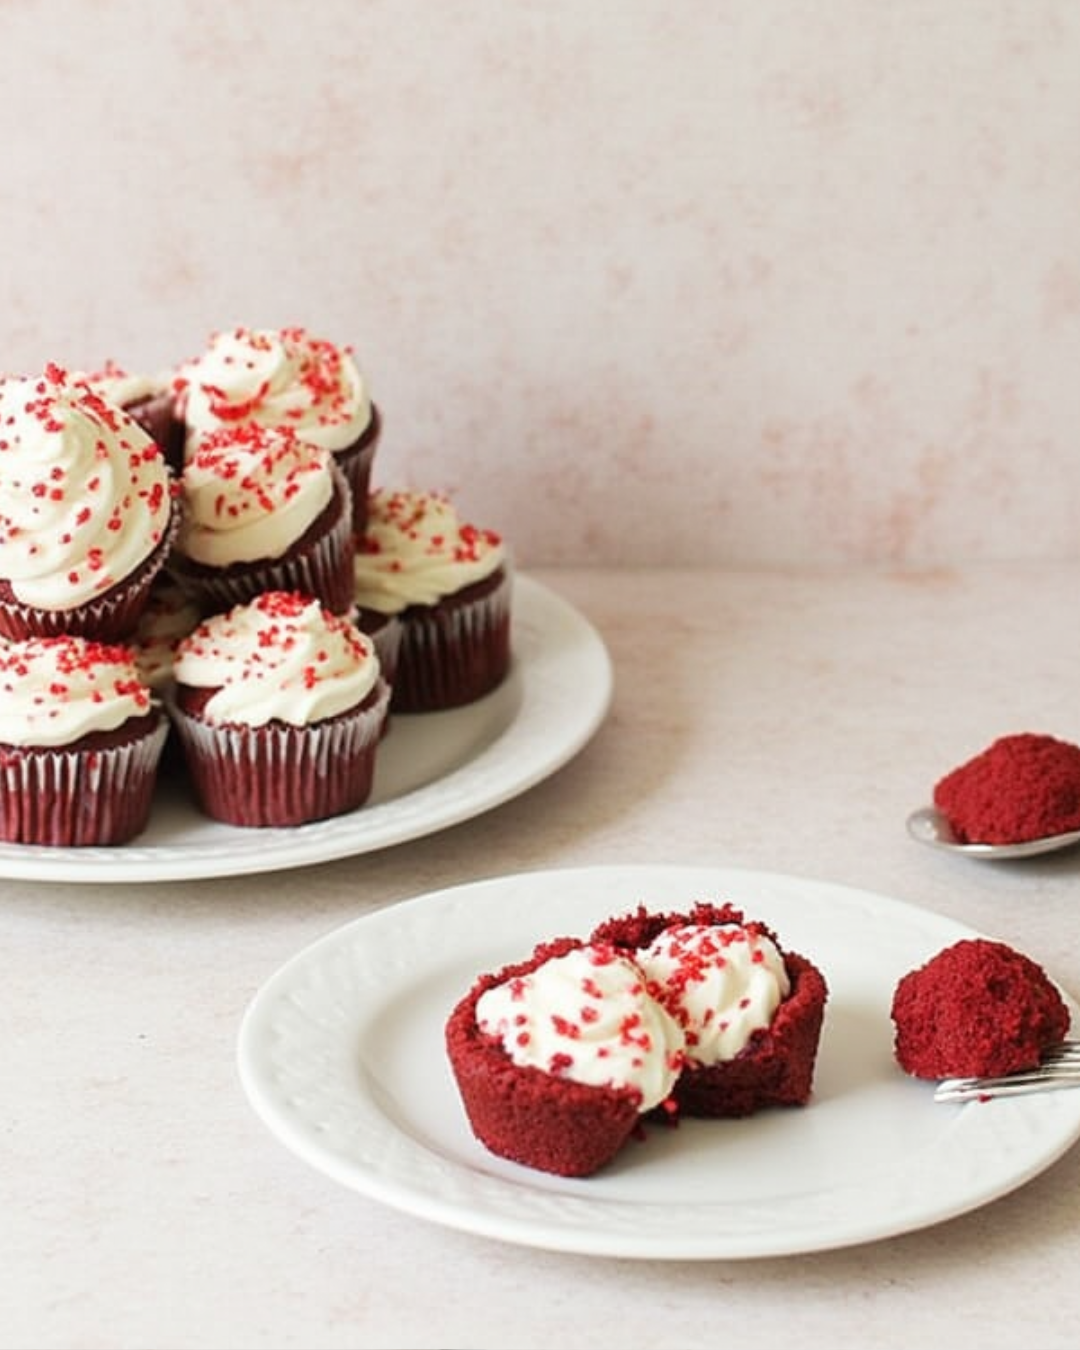
Once the cupcakes have cooled completely, it’s time to frost them. You can use a piping bag to pipe the frosting onto the cupcakes for a professional finish, or simply spread the frosting using a spatula. Decorate each cupcake with a generous swirl of cream cheese frosting. If desired, you can garnish with red velvet crumbs or even a few sprinkles for extra flair.
Step 9: Enjoy Your Red Velvet Cupcakes!
Now that your red velvet cupcakes are complete, take a moment to admire the beautiful, rich red color and the creamy frosting on top. The cupcakes are now ready to be enjoyed! Whether you’re serving them at a party or treating yourself to a delicious dessert, these red velvet cupcakes are sure to impress.
Tips for Perfecting Your Red Velvet Cupcake Recipe
Creating the perfect red velvet cupcake may take a little practice, but with these helpful tips, you can ensure that your cupcakes turn out just right every time.
1. Use Fresh Ingredients
Fresh ingredients make all the difference when baking. Ensure that your baking powder, baking soda, and cocoa powder are fresh to ensure the cupcakes rise properly and have the perfect texture.
2. Don’t Overmix the Batter
When combining the wet and dry ingredients, be careful not to overmix the batter. Overmixing can lead to dense, heavy cupcakes. Stir just until everything is combined.
3. Room Temperature Ingredients
For the best results, make sure your butter, eggs, and cream cheese are at room temperature before using them. This will help create a smooth, creamy frosting and ensure that the cupcakes rise evenly.
4. Sift the Dry Ingredients
Sifting the flour, cocoa powder, and other dry ingredients ensures that there are no lumps and that the ingredients are evenly distributed. This step helps create a lighter, fluffier cupcake.
5. Use Buttermilk for Tenderness
Buttermilk is essential for giving the cupcakes their signature tender texture. If you don’t have buttermilk, you can make a substitute by adding 1 tablespoon of lemon juice or white vinegar to a cup of regular milk. Let it sit for a few minutes before using.
Variations on Red Velvet Cupcakes
While the classic red velvet cupcake is always a crowd-pleaser, there are many variations you can try to add your own twist to this dessert.
1. Chocolate Red Velvet Cupcakes
If you love the flavor of chocolate, add a bit more cocoa powder to the batter to enhance the chocolaty taste. You can also top the cupcakes with chocolate ganache instead of cream cheese frosting for a decadent treat.
2. Red Velvet Mini Cupcakes
For smaller, bite-sized treats, make mini red velvet cupcakes instead of regular-sized ones. Simply reduce the baking time to 10-12 minutes and use a mini muffin pan.
3. Vegan Red Velvet Cupcakes
To make a vegan version of red velvet cupcakes, substitute the eggs with flax eggs (1 tablespoon of ground flaxseed mixed with 3 tablespoons of water per egg) and use plant-based milk instead of buttermilk. For the frosting, swap the cream cheese and butter with vegan cream cheese and margarine.
4. Red Velvet Cupcake Cake
For a unique twist, bake the red velvet batter in a round cake pan and frost it to create a beautiful cupcake cake. It’s perfect for birthday parties and special celebrations.
Conservation and Storage of Red Velvet Cupcakes
Red velvet cupcakes are best enjoyed fresh, but if you need to store them for later, here’s how you can keep them in top condition.
1. Room Temperature Storage
If you plan to eat the cupcakes within 2-3 days, store them in an airtight container at room temperature. This will keep them fresh and moist.
2. Refrigeration
For longer storage, place the cupcakes in an airtight container and refrigerate them. The cream cheese frosting may firm up slightly in the fridge, but the cupcakes will stay fresh for up to 5 days.
3. Freezing Red Velvet Cupcakes
If you want to store the cupcakes for an extended period, you can freeze them. Wrap each cupcake individually in plastic wrap and then place them in a freezer-safe bag. They will stay fresh in the freezer for up to 3 months. To enjoy, simply thaw them at room temperature and frost them when ready.
Serving Suggestions for Red Velvet Cupcakes
Red velvet cupcakes are incredibly versatile and can be served in various ways to complement any occasion. Here are some creative serving ideas:
1. Party Dessert
Serve red velvet cupcakes at your next party or gathering as a stunning dessert. They can be arranged on a tiered cake stand for a more elegant presentation.
2. Tea Time Treat
Pair a red velvet cupcake with a cup of tea for a delightful afternoon treat. The rich, tangy flavor of the cupcake pairs perfectly with a hot cup of black tea or herbal tea.
3. Gifts and Favors
Wrap individual red velvet cupcakes in cellophane and tie them with a ribbon for a thoughtful, homemade gift. They make excellent party favors for birthdays, weddings, or holidays.
4. Mini Red Velvet Cupcakes for Kids
Mini red velvet cupcakes are a great option for kids’ parties. You can decorate them with colorful sprinkles, or even top them with a small candy for a fun touch.
Frequently Asked Questions About Red Velvet Cupcakes
1. What is the difference between red velvet cupcakes and regular chocolate cupcakes?
Red velvet cupcakes are often mistaken for regular chocolate cupcakes, but they have a few key differences. The primary difference is that red velvet cupcakes are made with a small amount of cocoa powder, which gives them a mild chocolate flavor. Additionally, red velvet cupcakes are typically made with buttermilk and vinegar, which react with the baking soda to create a lighter, fluffier texture. The red color comes from the food coloring, which is what sets red velvet apart from traditional chocolate cakes.
2. Can I make red velvet cupcakes without food coloring?
Yes, you can make red velvet cupcakes without food coloring if you prefer a more natural look. The food coloring in red velvet cupcakes is mainly for aesthetics and does not contribute to the flavor. If you skip the red food coloring, your cupcakes will still have the same flavor, but they will be a chocolate-brown color instead of red. However, the vibrant red color is part of the charm of red velvet cupcakes.
3. What if I don’t have buttermilk? Can I substitute it?
Yes! If you don’t have buttermilk, you can easily make a substitute at home. Simply add one tablespoon of lemon juice or white vinegar to a measuring cup, and then fill it with regular milk (preferably whole milk) until it reaches the ½ cup mark. Stir it well and let it sit for 5 minutes before using it in the recipe. This mixture mimics the acidity and consistency of buttermilk, giving your cupcakes the desired texture and tang.
4. How do I know when my cupcakes are done baking?
The best way to check if your red velvet cupcakes are done is by inserting a toothpick into the center of one. If the toothpick comes out clean (or with just a few crumbs attached), the cupcakes are ready. You can also gently press on the top of a cupcake; it should spring back when touched, indicating it’s fully baked.
Conclusion: The Perfect Red Velvet Cupcake Awaits
Red velvet cupcakes are a delicious and versatile treat that can be enjoyed on any occasion. From the rich, tangy flavor to the smooth, creamy frosting, they offer a delightful combination that’s hard to resist. With the step-by-step instructions provided, you’ll be able to create your own batch of perfect red velvet cupcakes, ready to impress friends and family. Whether you stick to the classic version or try out one of the many creative variations, these cupcakes are sure to satisfy your cravings for something sweet and memorable. Happy baking!
Print
Red Velvet Cupcake Recipes
- Total Time: 35 minutes
- Yield: 12 cupcakes
- Diet: Vegetarian
Description
Easy to make and sure to impress, this red velvet cupcake recipe will become a go-to treat for any dessert lover.
Ingredients
- For the Cupcakes:
-
1 ½ cups all-purpose flour (190g)
-
1 cup granulated sugar (200g)
-
1 tablespoon unsweetened cocoa powder
-
½ teaspoon baking powder
-
½ teaspoon baking soda
-
¼ teaspoon salt
-
1 cup vegetable oil (240ml)
-
2 large eggs
-
1 teaspoon vanilla extract
-
1 tablespoon red food coloring
-
1 teaspoon distilled white vinegar
-
½ cup buttermilk (120ml)
- For the Cream Cheese Frosting:
-
8 oz cream cheese, softened (225g)
-
½ cup unsalted butter, softened (115g)
-
4 cups powdered sugar (480g)
-
1 teaspoon vanilla extract
-
A pinch of salt
Instructions
- Step 1: Preheat the Oven and Prepare the Cupcake Pan
- Preheat your oven to 350°F (175°C). Line a 12-cup muffin pan with cupcake liners to prevent sticking and make cleanup easy.
- Step 2: Mix the Dry Ingredients
- In a medium-sized bowl, whisk together the dry ingredients:
-
1 ½ cups all-purpose flour
-
1 tablespoon cocoa powder
-
½ teaspoon baking powder
-
½ teaspoon baking soda
-
¼ teaspoon salt
- Ensure all the ingredients are well combined and set the bowl aside.
- Step 3: Combine the Wet Ingredients
- In another large bowl, whisk together the wet ingredients:
-
1 cup vegetable oil
-
2 large eggs
-
1 teaspoon vanilla extract
-
1 tablespoon red food coloring
-
1 teaspoon distilled white vinegar
-
½ cup buttermilk
- Mix until fully combined and smooth.
- Step 4: Incorporate Dry Ingredients into Wet Ingredients
- Slowly add the dry ingredients to the wet ingredients, alternating with the ½ cup buttermilk. Start by adding half of the dry mixture, then half of the buttermilk, and continue alternating until everything is combined. Stir gently to avoid overmixing, as this can make the cupcakes dense.
Notes
Room Temperature Ingredients: For the best results, make sure that your butter, eggs, and cream cheese are at room temperature before using them in the recipe. This ensures smoother batter and frosting, which will give your cupcakes a lighter, fluffier texture.
Red Food Coloring: While liquid food coloring is commonly used, you can also use gel food coloring for a more vibrant red hue. Just be sure to use the same amount as the recipe calls for.
Don’t Overmix: When combining the wet and dry ingredients, be sure to mix only until the ingredients are incorporated. Overmixing can result in dense cupcakes.
- Prep Time: 15 minutes
- Cook Time: 20 minutes
- Category: Dessert
- Method: Baking
- Cuisine: American
Nutrition
- Serving Size: 1 cupcake
- Calories: 250-300 kcal
- Sugar: 20g
- Sodium: 150mg
- Fat: 12g
- Saturated Fat: 3g
- Unsaturated Fat: 7g
- Trans Fat: 0g
- Carbohydrates: 35g
- Fiber: 1g
- Protein: 3g
- Cholesterol: 30mg